Amateur Holography--Simple & Low Budget
A mirror of the same page from the:SOCIETY FOR AMATEUR SCIENTISTS
Web Site
Welcome to Amateur Holography
-
Acknowledgement:
-
The procedures described in the sections Setting up, and Exposure/Development are adaptations from methods taught by Dr.Mac Rugheimer of Montana State University to countless students, teachers, and amateur holographers in his "no prerequisites" holography class, his hologram exhibits, and numerous presentations to K-12 students and teachers. He is a pioneer of amateur holography.
This page will provide you with a clear idea of what holography is by showing you how it can done simply with a minimum of resources. If you are only interested in getting acquainted with holography, click WHAT IS HOLOGRAPHY in the menu below. Also, go to RELATED LINKS to visit some very interesting commercial holography sites. If you are interested in MAKING holograms, you will find here a very simple, inexpensive, and complete procedure for making very nice holograms. ENJOY the tour!***********
- THE PRESENTATION THAT FOLLOWS WAS PREPARED WHEN AMATEUR HOLOGRAPHY
WAS BASED ALMOST EXCLUSIVIVELY ON AGFA 8E75 FILM AND PLATES. SINCE
THE FALL OF 1997, AGFA ABANDONED ITS HOLOGRAPHY PRODUCT LINE .
THE RUSSIAN COMPANY SLAVICH HAS COME UP WITH AGFA EQUIVALENTS PFG-01
AND PFG-01M PLATES AND FILM. INFORMATION ON THE COMPLETE LINE OF SLAVICH
MATERIALS CAN BE FOUND AT:
3Deep Company <= Click
- THE SLAVICH PLATES CAN BE DEVELOPED USING THE DEVELOPERS RECOMMENDED BY THE MANUFACTURER OR THE ONES FORMERLY USED WITH AGFA 8E75 SUCH AS JD-3.
------------ - ANOTHER IMPORTANT RECENT DEVELOPMENT IN AMATEUR HOLOGRAPHY IS THE USE OF VERY INEXPENSIVE LASER POINTERS TO MAKE HOLOGRAMS. TWO HOLOGRAPHY LINKS AT THE END OF THIS PAGE DEAL WITH LASER POINTERS EXTENSIVELY:
- Frank DeFreitas' Holoworld
holography site <= Click
-
What is holography?
A short but almost complete introduction to the field
- Things needed?
A list to help you plan your own holography lab
- Setting up
A modest, small-scale set up that works. A good place to start.
- Exposure/Development
The darkroom part of holography
- Sources of materials
The key words for materials are: LOW BUDGET
- References
A short reading list
- Related links
Other holographic resources on the Internet.
What is a hologram?
- It is a light wave interference pattern recorded on photographic film (or other suitable surface) that can produce a 3-dimensional image when illuminated properly.
How is a hologram made?
-
A laser beam is split into two beams: {see diagram above}
- The reference beam is spread by a lens or curved mirror and aimed directly at the film plate
- The object beam is spread and aimed at the object. The object reflects some of the light on the holographic film-plate. The two beams interact forming an interference pattern on the film. This is the hologram. Laser light is needed because it is made of coherent waves (of same wavelength and phase). The principle of holography was discovered in Britain by Dennis Gabor in 1948. He was awarded the Nobel price for this discovery in the early 70's.
- The reference beam is spread by a lens or curved mirror and aimed directly at the film plate
-
A laser beam is split into two beams: {see diagram above}
How is a hologram viewed?
- When the hologram is illuminated from the original direction of the reference beam, a 3-dimensional image of the object appears where the object was originally. Some holograms must be viewed with laser or monochromatic (single color) light, and others with white light.
What are the main types of holograms?
-
Transmission Holograms: Viewable with laser light. They are made with both
beams approaching the film from the SAME side.
- Reflection (White Light) Holograms: Viewable with white light from a suitable source such as spotlight, flashlight, the sun, etc. They are made with the two beams approaching the holographic film from OPPOSITE sides.
- Multiple channel holograms: Two or more images are visible from different angles. There are different types of multiple channel holograms:
- Simple ones with 2, 3, or a few images each viewed from a different angle.
- Multiplex: A large number of "flat" pictures of a subject viewed from different
angles are combined into a single, 3-dimensional image of the object. A COMPOSED
hologram.
- Rainbow holograms: The same image appears in a different color when viewed from different angles.
- Real Image Holograms (H-2's)
- These are usually reflection holograms made from a transmission original (H-1). The image dramatically projects IN FRONT OF THE PLATE toward the viewer. Most holograms in holography museums are of this type. The procedure for making them is quite elaborate and demands precise control of angles.
- Mass-Produced Holograms
- Embossed--Made by stamping on foiled backed mylar film using a metal master (most
common method).
- Polymer--Made from light sensitive plastic. The Polaroid Corporation mass
produces holograms by this method.
- Dichromates--Very vivid holograms on jewelry, watches, etc. They are recorded on a light sensitive coating of gel that contains dichromate.
- Reflection (White Light) Holograms: Viewable with white light from a suitable source such as spotlight, flashlight, the sun, etc. They are made with the two beams approaching the holographic film from OPPOSITE sides.
-
Transmission Holograms: Viewable with laser light. They are made with both
beams approaching the film from the SAME side.
What are some applications of holography?
-
Holographic Art--Holography museums, advertising, postage stamps, jewelry,
etc.
- Security from Forgery--Credit cards, tickets, etc.
- Optical Devices--Holographic lenses, diffraction gratings, etc.These are holograms in which the "object" is a mirror or a lens.A flat mirror as an object produces a diffraction grating. A lensor a concave mirror as the object produce a hologram that behaves LIKE A LENS! These HOLOGRAPHIC LENSES are lighter than traditional lenses and mirrors and they can be designed to perform more specialized functions such as making the panel instruments of a car visible in the windshield for enhanced safety.
- Holographic Interferometry--A very precise technique for measuring changes in the dimensions of an object. Useful in industrial stress analysis, quality controll, etc.
- Pattern Recognition--Using electro-optical devices with computers to interpret what is "seen" by a machine. Peace-time and military application of lasers and holographic optical devices.
- Medical Applications--Combining CAT scans into a 3-dimensional image, A multiplex. Ultraound holography, etc.
- Other--Holographic computer memory storage, holographic microscopy, holographic radar, etc.
- Security from Forgery--Credit cards, tickets, etc.
-
Holographic Art--Holography museums, advertising, postage stamps, jewelry,
etc.
- A helium-neon laser, 1-10 milliwatt (the higher the better)
- A lens or concave mirror (10X to 20X / FL15 to 20mm)
- A small object (model). Pewter figurines work well
- Holographic film or plate: Agfa 8E75 is the amateur's choice(2.5in
x 2.5in glass plates would be best for a beginner. Film is less expensive
but more difficult to use. It must be clamped between glass plates
to keep it flat)
- A sturdy table and sturdy bases and mounts for the laser, the optical
components, the model, and the holographic plate. Concrete blocks
make good bases. Lenses and mirrors should be mounted on rods or clamps
which, in turn, are mounted on short ring stands with a triangular bases.
Other mounts can be used as long as they are firm. [Diagram 4]
- A room WITHOUT too much air movement or too much ventilation noise
or other kinds of vibration, that can be darkened. It should have a
uniform stable temperature.
- One or more GREEN safe-lights 25 watts or less. They should not shine
directly onto the light sensitive surface.
Chemical Hazards MOST CHEMICALS LISTED HERE ARE EITHER TOXIC OR HAZARDOUS TO EYES AND SKIN. THE SOLUTIONS SHOULD BE MADE BY {OR UNDER THE SUPERVISION OF} A PERSON EXPERIENCED IN THE USE OF HAZARDOUS CHEMICALS
Developing and bleaching solutions: - DEVELOPER (Discarded after using once)
Solution A: Pyrogallol 10.0 grams/Liter
Solution B: Sodium carbonate 60 g/L
Solutions A and B are mixed at equal volumes just before development.
- ALTERNATE DEVELOPER (Reusable for one day)*
Solution A: 20 grams catechol, 10 grams ascorbic acid,
10 grams sodium sulfite, and 75 grams urea in one liter of distilled water.Solution B: 60 g sodium carbonate per liter
Solutions A and B are mixed at equal volumes just before development.
*A newer developer named "JD-3" is available from The Photographers' formulary.
See SOURCES of materials. It is reported to be less hazardous.- Bleach (RE-USABLE)
4.0 g. potassium dichromate and 8 mL sulfuric acid per liter- Photo-flow solution to avoid spots
- Darkroom utensils
- *3, 5in x 7in darkroom trays any color (White preferred)
*Disposable plastic gloves (cafeteria type)
*Small darkroom tongs (plastic or stainless steel)
*Green safe-lights (NOT red or orange)
- A hair drier.
- Should be used with caution to dry the hologram without scorching it.
- DEVELOPER (Discarded after using once)
- The holographic set-up is seen as shown in the diagrams. Beam alignments
and spread are done in green light. The scene is composed with the object
and a discarded holographic plate (or a glass plate of similar size)
so that everything is seated firmly without teeter-tottering. A small
white card is used to trace the path of the beam. The beam diameter
at the plate should be large enough to cover the plate.
- Now the beam is blocked, all lights off except the green safe-light.
The bad plate is replaced carefully with a good unused holographic plate.
The emulsion (sticky) side is facing the object. Feel the edges for
firm seating. Remember to secure the unused plates or film in the original
box NOW! Wait a few minutes for temperature equilibrium.
- No unnecessary motion now. Absolutely no contact of body parts
or clothing with the table. LIFT THE BEAM BLOCKING CARD OFF ITS SUPPORT--STILL
BLOCKING THE BEAM. WAIT WITHOUT MOVING 30 SECONDS TO 1 MINUTE. GENTLY
LIFT THE CARD OFF THE BEAM 6-10 SECONDS, THEN PUT IT IN ITS ORIGINAL
POSITION TO BLOCK THE BEAM AGAIN. (See Diagram 4)
4. Development
- Now the plate is ready for development. Set up three 5 x 7 trays
labeled DEVELOPER, BLEACH, PHOTO-FLOW:
- DEVELOPER--50ml developer (a), 50ml developer (b), and
50ml dist. water. Mix. Place the plate in the developer emulsion
up. Lift one end of the tray gently every few seconds for agitation.
In about 2 minutes the exposed surface will be very dark.
- WASHING--Pick up with plastic disposable glove. Hold paper
towel with the other hand to catch drips. Place in a deep container
in the sink under running water for three minutes. This container
should be narrow enough so that the film or plate are not horizontal.
- BLEACHING--Place 100ml or more bleach in a tray. Place
the developed plate in i t face-up and agitate gently as in the
developer. LIGHTS MAY BE TURNED ON. Continue until all the darkness
(silver coating) is gone, then 30 seconds longer.
- WASHING--(Same as first washing)
- PHOTO-FLOW--Dip the plate in a photo-flow solution (prepared
according to the directions on the little bottle), drain well, blot
(NO WIPING OR SQUEEGEE), with lint-free blotter. Finish drying with
a WARM hair drier using a rapid sweeping motion.
- MOMENT OF TRUTH--View with a small indoor spotlight or a flashlight to see if anything is there.....Diagram 5 shows the relationship between illumination during exposure (a)and illumination when viewing the finished hologram (b) & (c).
NOTE: The viewing direction, should be approximately the opposite of
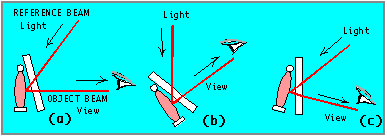
Diagram 5 the direction of the reflected light from the object when the hologram was made. To express it a little differently, the angle between the line of sight towards the image and the line of illumination is the same as the angle between the reference beam and the object beam. Diagram (a) shows the original positioning of of the plate and the object for exposure and the directions of the two light beams. It also shows how the plate should be illuminated by a spotlight and how it should be viewed to see the image where the object WAS. When the plate is rotated, the lines of illuminastion and viewing rotate also.
Go back to the MENU
C. SOURCES OF MATERIALS
{Note: You can link directly with some suppliers listed below by going to the Society of Amateur Scientists (SAS) site looking for the discount and surplus suppliers, list. See menu/Links to.....}-
Cheap lasers and components
NOTE: For multiple beam holography, specify low beam divergence of 1.2 mrad or less, and TEM 00. It is desirable to meet those specifications although not required for single beam holography.
- Meredith Instruments, Inexpensive laser and Supplies, (800)722-0392
- MWK Industries, Inexpensive lasers and supplies, (800)356-7714, (909)278 0563
- Midwest Laser Products, PO Box 2187, Bridgeview, IL 60455, 708-460-9595
Inexpensive new and used lasers & equipment
- Allegro Electronic Systems, 3 Mine Mountian Road, Drawer NV, Cornwall Bridge, CT 06754 Mail-order supplier of lasers, kits, etc.
Holographic plates or film
- Jodon Engineering, 145 Enterprise dr., Ann Arbor,MI 48103,
(313)761-4044
- Integraf
3. Chemicals
- Fluka Chemical Corp., 980 S. Second St.,Ronkonkoma, NY 11779,
1-800-FLUKA US
- Photographers' Formulary, 1-800-922-5255
- Integraf (see above)
- Local sources
-
Sodium carbonate (washing soda)
- Ascorbic acid (vitamin C), pure powder or crystals
-
Sodium carbonate (washing soda)
Mirrors and lenses
- Edmund Scientific Corp., ask for their optics catalog, (609) 573-6250
- Meredith Instruments, Inexpensive laser and Supplies, (800)722-0392
- The Holography Handbook, by Fred Unterseher and co-authors
Ross Books, 1987
- The Complete Hologram Book, by J. E. Kasper & S. A. Feller,
Prentice-Hall, 1987
- Homemade Holograms--The Complete Guide to Inexpensive
Do-It-Yourself Holography, by John Iovine, Tab Books, 1990
- Understanding Lasers, by Jeff Hecht, H. W. Sams and Co., 1988
- Scientific American--Several articles since 1965. Here are some:
- (a) Emmett Leith and Juris Upatnieks, Photography by Laser, June
1965. For the first time Americans hear about holography from the two University of
Michigan researchers who did it first.
- (b) The Amateur Scientist, Feb 1967: Homemade Hologram
- (c) The Amateur Scientist, Jyly 1971: Stability of the Apparatus
- (d) The Amateur Scientist, Nov.1972: Holograms with Sound ...Waves
- (e) The Amateur Scientist, Feb 1980: Easy Way...
- (f) The Amateur Scientist, Sept 1986: Rainbow Holograms
- (g) The Amateur Scientist, May 1989: How to.......Make Holograms
- Viewable in White Light
- (b) The Amateur Scientist, Feb 1967: Homemade Hologram
- Practical Holography, by C.Outwater & V.Hamersveld, Dimensional Arts,Inc. An ONLINE textbook on holography.
Go back to the MENU
D. LINKS TO OTHER HOLOGRAPHY SITES
- Society for Amateur Science
- The MOST comprehensive site for all kinds of amateur science.
- If you are reading this, you are in it.
- Integraf. A Holography site by Allan C.Jeong.
- A beautiful site covering all aspects of holography,
- including sources of materials
- MIT Holovideo Project
- A very ambitious research project to develop holograpic
- television. Check it out once in a while.
- A Holography Production Site
- This site by Steve Michael is a MUST for any aspiring
- holographer. A superbly illustrated guide for a beginner.
- Steve takes you step-by-step into the real depths of
- hologram production on a layperson's level.
- Hand-drawn holograms
- Very interesting: Makes you wonder what holography really is
- after you convince yourself you know.
- Ross Books
- Holography books that include actual holograms and updated
- information about the holography industry.
- Holoworld holography site
- An impressive site for learning about holography and for
- shopping for holograms and holographic resourses.
- You can pick up the Holo-gram newsletter here.
- Hypermedia Technologies
- Multiple commercial site for several companies.
- AD2000, Cherry Optical, Holaxis, ...etc.
- Shop for holographic T-shirts, holograms, etc..
- Holographie--Do It Yourself
- A German language site for holography enthusiasts
- wishing to make their own holograms
- Museum of Holography--Chicago
- A great exhibit of artistic and medical holography
- Hologram bargains and holography classes available
- Token admission cost
- Holography News
- The holography industry newsletter
- HOLOCOM, INC
- A colorful, multiple commercial site with links to
- Holos Galery, Holography Marketplace, Search the Light
- Holograms & Lasers, The Holography Domain, etc.
- Practical Holography
- A great online reference book on holography
Go back to:
The TOP........ George's LINKS........ the GUESTBOOK
You are guest number
since Sept. 23, 1996.
Please visit again
IN-AP Systems - Established 1997

A computer is like the mind, it has IN-finite AP-plications. . .
- Now the plate is ready for development. Set up three 5 x 7 trays
labeled DEVELOPER, BLEACH, PHOTO-FLOW:
Steve Michael's A Holography Production Site <= ClickContents
A. WHAT IS HOLOGRAPHY?
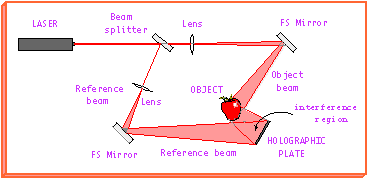
Diagram 1 Go back to the MENU
B. MAKING HOLOGRAMS
1. Things needed:
NOTE: This list does not include a sand-table which is cumbersome to construct. For the simplest type of holography, single-beam reflection type, a sturdy table or bench will do fine.
Laser Hazards (I) A laser power supply is typically 2500 volts or more. If you do your own wiring for an EXTERNAL power supply ordinary insulation is not adequate. A qualified person must do it. Better yet, buy a self contained laser or one with cable to the power supply included. (II). The laser beam is an EYE HAZARD if one looks directly into it or a reflection of it from a shiny object. After the beam is spread the danger is diminished
Lasers, accessories, and recording material 2. Setting Up
This is the easiest type of holography for amateurs. In its simplest form, it requires only a laser, a lens, a holographic plate, and some darkroom supplies. A sturdy table and firm supports for the laser, the lens, the holographic model and the film or plate are necessary.
Freedom from vibrations within millionths of a centimeter must be assured. Air currents, ventilation noises, changes in temperature (that causes movement), walking, making any contact with the table during exposure, guarantee failure. The greater the number of optical components (beam splitters, mirrors etc.), the greater the destructive effect of vibrations.
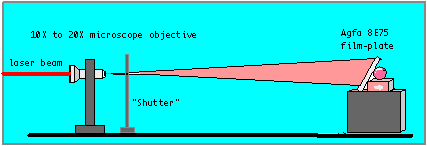
Diagram 2 NOTE: This "single-beam" set-up actually generates a second beam as some of the light going to the object through the plate reflects back to the plate. The original and the reflected beams form an interference pattern on the holographic plate which is recorded to produce a hologram:
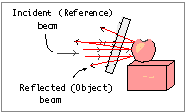
Diagram 3 It is desirable for the plate to make contact with the object so that if there is any movement they will move together. In that case, there is no motion of one beam relative to the other. This is the next best thing to having no motion at all.
The assembly on the previous page is the simplest but it is difficult to align, it requires a very long table or two tables, and the angle at which the laser-beam strikes the plate-object combination cannot be controlled. also using a lens without a spatial filter produces a "dirty" beam--full of interference patterns because of dust particles. Using a front-surface coated concave mirror with a focal length of 15 to 25 mm and a flat mirror (also front-coated) alleviates these problems.
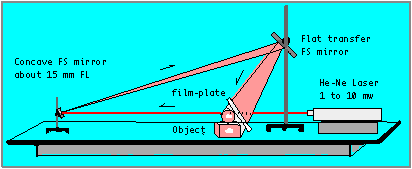
Diagram 4 The above assembly is very compact and it provides complete control of the angle at which the laser beam strikes the holographic plate and the object. This is important because it ultimately determines the angle at which the finished hologram must be illuminated by a spotlight (or a flashlight) for comfortable viewing.
Go back to the MENU
3. Exposure
- THE SLAVICH PLATES CAN BE DEVELOPED USING THE DEVELOPERS RECOMMENDED BY THE MANUFACTURER OR THE ONES FORMERLY USED WITH AGFA 8E75 SUCH AS JD-3.
IMPORTANT UPDATE (JUNE 1999):
- THE PRESENTATION THAT FOLLOWS WAS PREPARED WHEN AMATEUR HOLOGRAPHY
WAS BASED ALMOST EXCLUSIVIVELY ON AGFA 8E75 FILM AND PLATES. SINCE
THE FALL OF 1997, AGFA ABANDONED ITS HOLOGRAPHY PRODUCT LINE .
THE RUSSIAN COMPANY SLAVICH HAS COME UP WITH AGFA EQUIVALENTS PFG-01
AND PFG-01M PLATES AND FILM. INFORMATION ON THE COMPLETE LINE OF SLAVICH
MATERIALS CAN BE FOUND AT:
3Deep Company <= Click